Tuesday, November 30, 2010

November 30, 2010

Well, I bid farewell to November and say hello to December with a few Christmas cards I made last week but didn't have time to post. These cards will be for sale at a "Handmade" Open House this Friday!

This first one uses a retired set, it was a Hostess Set in last year's mini catalog (I'm pretty sure). This was very easy, but looks SO pretty with the Iridescent Ice!

Supplies:
Stamp Set: Printed Pines
Ink: VersaMark, Old Olive, Cherry Cobbler
Paper: Cherry Cobbler, Crumb Cake
Tools: Iridescent Ice Embossing Powder, Heat Tool, Big Shot, Top Note die, Petals-A-Plenty Embossing Folder
Embellishments: 3/8" Old Olive Taffeta ribbon, Basic Pearls

----------
This card is copied from a sample I received in a card swap. She had used Bravo Burgundy card stock for the card base, Very Vanilla for the Top Note; then stamped the block stamp in Bravo Burgundy ink and hand cut the tree stamped in Bravo Burgundy ink on Bravo Burgundy card stock. Nice, if you want monochromatic. I, however, wanted a little more interest. I spiced it up with more color and added rhinestones!

Supplies:
Stamp Set: Season of Joy
Ink: Old Olive, Early Espresso, Daffodil Delight, Cherry Cobbler, Crumb Cake
Paper: Cherry Cobbler, Whisper White
Tools: Big Shot, Top Note die, 3/4" Circle punch
Embellishments: Basic Rhinestones, 5/8" Old Olive Grosgrain ribbon

----------
And, lastly, I had to try the Paper Tree technique. I first saw this on Connie Babbert's blog. Follow the link, she had a PDF with a template to download. It takes a bit of trial and error (at least it did for me!) and I think I will do a smaller circle next time. But it is certainly fun and looks great!

Supplies:
Stamp Set: Come to Bethlehem
Ink: Cherry Cobbler, Old Olive (sponged)
Paper: Old Olive, Cherry Cobbler, Whisper White, retired Old Olive DSP
Tools: Circle Scissor Plus, Big Shot, Petals-A-Plenty Embossing Folder, label from Matchbox die
Embellishments: Basic Rhinestones

Thanks for clicking over to my blog today!

Thursday, November 25, 2010

November 25, 2010

Make & Take for my next workshop:

Supplies:
Stamp Set: Come to Bethlehem
Ink: Early Espresso
Paper: Cherry Cobbler, Early Espresso, Very Vanilla, Crumb Cake
Tools: Big Shot, Petal-A-Plenty Embossing Folder, Label from the Matchbox die, tearing edge, distressor tool
Embellishments: Basic Rhinestone

Thanks for clicking over to my blog. Happy Thanksgiving!

Thursday, November 18, 2010

November 18, 2010

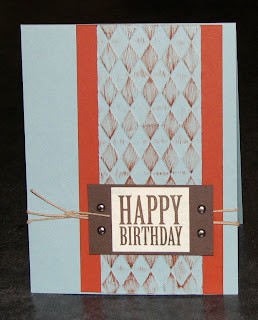
This color combination found me, so to speak, and I love it! I was pulling out some Baja Breeze yesterday and happend to pull some Cajun Craze out as well. I thought those two colors looked good together! I pulled out my ring of "swatches" and found one more color to put with them: Early Espresso. Love it! Perfect for a guy card.

I put the Baja Breeze strip through the Big Shot on the Texturz Plate then I swiped it with the Cajun Craze pad several times. It's harder to see, but I sponged Baja Breeze on the Very Vanilla piece.
Supplies:
Stamp Set: Afterthoughts
Ink: Early Espresso, Baja Breeze, Cajun Craze
Paper: Baja Breeze, Cajun Craze, Early Espresso, Very Vanilla
Tools: Big Shot, Texturz Plates Backgrounds 1
Embellishments: Silver Brads, Hemp Twine

Thanks for clicking over to my blog today!

Saturday, November 13, 2010

November 13, 2010

A customer at the workshop I did last night thought this dog was just so cute! But she didn't feel like she would actually use the set. I made this to send to her; I'll write on a PostIt and stick it in (instead of on the card) so she can use it.

I inked the Texturz plate by swiping/sliding the ink pad all over it. I made sure the whole plate was covered by a scratch paper so as not to get ink on my silicone pad.


I just wasn't feeling the sentiment on the front; couldn't get it in the right spot, I guess. So, I put it on the inside. Usually when one sends a Get-Well card, the note is brief - it's mostly to represent that the ill is being thought of and there is a desire to brighten their day. So, I felt it was okay to not have much writing room.

Supplies:
Stamp Set: Wellness Wishes
Ink: StazOn black, Basic Gray, Melon Mambo, Daffodil Delight, Tangerine Tango, Crumb Cake
Paper: Crumb Cake, Whisper White, Melon Mambo, Tangerine Tango, Daffodil Delight
Tools: Blender Pens, Big Shot, Top Note die, Backgrounds 1 Texturz plates, 2 1/2" Circle punch, 2 3/8" Scallop Circle punch, 1 3/4" Circle punch, Circle Scissor Plus, Modern Label punch, Word Window Punch
Embellishments: 3/8" Daffodil Delight Taffeta ribbon, Basic Rhinestones

Thanks for clicking over to my blog today!

Friday, November 12, 2010

November 12, 2010

**Just Add Ink challenge card is second in this post**

Well, I was going to make a mitten Christmas card, but none of my Christmas-y sentiments seemed to compliment this set (and I'm not so fond of "have a cute Christmas" which is the sentiment contained in the set). It then turned into just a winter card. :) The card features the paper buttons and also the spotlighting technique. (Stamp the image on a separate paper, punch out a portion and pop that up on the main image. I also like to add a second, colored circle underneath, as you can see.) I love these colors together!

Supplies:
Stamp Sets: A Cute Christmas, Apple Blossoms
Ink: StazOn black, Soft Suede, Pink Pirouette, Wild Wasabi, Baja Breeze
Paper: Crumb Cake, Candy Cane Christmas, Whisper White, Pink Pirouette
Tools: Big Shot, Top Note die, Modern Label punch, Word Window punch, 3/4" Circle punch, 1" Circle punch, 1/2" Circle punch, Crystal Effects, 1/16" hole punch, dimensionals, Blender Pens

----------

Next, I have another Candy Cane Christmas card... literally! :) I made it for the Just Add Ink Christmas Card challenge. This candy cane die is a Sizzix die I bought via eBay 2 years ago and haven't used much since completing the project for which it was purchased. But the striped sheet in the Candy Cane Christmas DSP pack just called for it to be pulled out of the drawer! I used the "have a" and "Christmas" parts of the "have a cute Christmas" phrase, but then used the "sweet" from Sweet Scoops. I thought it appropriate for the candy canes!

Supplies:
Stamp Sets: A Cute Christmas, Sweet Scoops
Ink: Real Red
Paper: Real Red, Candy Cane Christmas DSP, Blushing Bride, Whisper White
Tools: 1" Circle punch, 1 1/4" Circle punch, 2 3/8" Scallop Circle punch, Big Shot, Sizzix candy cane die, Embellishments: 1/8" Real Red Taffeta ribbon, Jumbo 5/16" Neutrals Brads Silver, Real Red brads, glue dots, dimensional

Thanks for clicking over to my blog today!

Thursday, November 11, 2010

November 11, 2010

I've been playing with the set A Cute Christmas. I'm doing a workshop tomorrow. The Make & Take will be a gift tage, maybe 2! This set will be a gift for the hostess (still gotta make a cute cellophane package for them). I folded a length of paper in half at 2", then punched with my circle to get the flap tags.

Supplies:
Stamp Set: A Cute Christmas
Ink: Real Red, Garden Green, Baja Breeze
Paper: Candy Cane Christmas, Real Red, Blushing Bride, Garden Green, Baja Breeze, Whisper White
Tools: 2 3/8" Scallop Circle punch, 1 3/8" Scallop Circle punch, 1 3/4" Circle punch, 1 3/8" Circle punch, 1 1/4" Circle punch, 1" Circle punch
Embellishments: Brads Silver, Jumbo Brads Neutrals, 1/8" Real Red Taffeta ribbon

----------

Here I have a scrapbook page with A Cute Christmas. These picture turned out perfect when I antiqued them and faded the color a bit. The browns and pink are about perfect to match Soft Suede and Blushing Bride!

Supplies:
Stamp Set: A Cute Christmas
Ink: Wild Wasabi, Baja Breeze, Blushing Bride, Soft Suede, VersaMark
Paper: Candy Cane Christmas, white thin card stock for the snow hills, Blushing Bride, Wild Wasabi, Soft Suede, Baja Breeze, Whisper White (snowflakes)
Tools: Big Shot, Snowflake die, Snowflake punch, Double Scallop Ribbon Border punch, White Embossing Powder, heat tool
Embellishments: Brads silver

Thanks for clicking over to my blog today!
Wednesday, November 10, 2010

November 10, 2010

I just received the Cute Christmas set yesterday. I'm going to use it for my next 2 workshops. I love the images in the set (although, I'm not too keen on the "have a cute Christmas" phrase...). This card is what we'll be making at a workshop next Thursday. It is totally CAS, clean and simple. I don't often make a card without using White or Vanilla and without using a sentiment on the front. I did put "Merry Christmas and a Happy New Year" from Occasional Quotes on the inside, though.

The button is actually a paper button. I punched four 1/2" circles, glued them into a stack, punched two holes (which you can't see), sanded the edges a bit, then topped it with Crystal Effects to give it a glossy sheen. I simply tied a little knot of the ribbon and glued it on top of the button, as my holes were too small to put the ribbon through!


Supplies:
Stamp Set: Cute Christmas
Ink: Real Red
Paper: Sahara Sand, Certainly Celery
Tools: 2 3/8" Scallop Circle punch, 1/2" Circle Punch, Big Shot, Perfect Polka Dots Embossing Folder, Dimensionals, 2 Way Glue Pen
Embellishments: Crystal Effects, 1/8" Certainly Celery Taffeta ribbon

Thanks for clicking over to my blog today!

My First Mojo!

Mojo Monday is one of those sites I see mentioned all over SplitCoast and blogs, but I had never participated in a challenge from them. Until this week, that is! Their sketches are a little more involved than I usually get with my cards. We'll see if I do some more with them in the future... :)

This weeks challenge led me to make a Christmas card.

Supplies:
Stamp Set: Season of Joy
Ink: Cherry Cobbler, Old Olive, Daffodil Delight, Marin Mist, Early Espresso, Crumb Cake
Paper: Cherry Cobbler, Sweet Pea DSP, Early Espresso, Daffodil Delight, Marina Mist, Very Vanilla
Tools: paper piercer and guide, Large Oval punch
Embellishments: 3/8" Old Olive Taffeta ribbon

Thanks for clicking over to my blog today!

Sunday, November 7, 2010

November 7, 2010

Ended up having unexpected free time this evening so, of course, I used it wisely. :) I made this card for the Stamping 411 Saturday Sketch Challenge this week. I finally found a use for these Pumpkin and Olive Flower Fusion Daisies that have been in my stash for a year!


Supplies:
Stamp Sets: Upsy Daisy, For All You Do
Ink: So Saffron, Chocolate Chip
Paper: Pumpkin Pie, Sweet Pea DSP, Chocolate Chip, So Saffron
Tools: Curly Label punch
Embellishments: Flower Fusion, 1/4" Always Artichoke Grosgrain ribbon, Brads

Thanks for clicking over to my blog!

Friday, November 5, 2010

November 5, 2010

I snuck in one more card before bed last night, totaling 4 cards made yesterday. Then I made 4 another cards today at my still-new-to-me desk!!! They are super cute! BUT I decided to just pick 2 to show you. Tough choice... I'll probably end up coming back another time to post the others. :)

First is a rainbow of butterflies! I envisioned them in a straight line across the card, but this butterfly is too big for that. And I felt the other butterflies in the Beautiful Wings embosslit were too small. But I might go back and try it with the next size down sometime.

Supplies:
Stamp Set: Apple Blossoms
Ink: Early Espresso, Pacific Point, Tangerine Tango
Paper: Sahara Sand, Whisper White, Poppy Parade, Tangerine Tango, Daffodil Delight, Garden Green, Pacific Point, Concord Crush
Tools: Big Shot, Beautiful Wings Embosslit, dimensionals
Embellishments: Basic Rhinestones

----------
Next, I used a favorite color combo of mine: Cameo Coral, Baja Breeze and Not Quite Navy. This is one of the main reasons why it is unfortunate that Cameo Coral was retired! But I still have nearly a whole pack of Cameo Coral card stock to wean me off of this combo. LOL :)

Supplies:
Stamp Set: Well Scripted
Ink: Baja Breeze, Not Quite Navy
Paper: Sahara Sand, Cameo Coral, Baja Breeze, Not Quite Navy, Whisper White
Tools: Big Shot, Perfect Polka Dots EF, 1 3/4" Circle Punch, 2 3/8" Scallop Circle punch, Boho Blossoms punchs, dimensionals
Embellishments: Pewter Brads

Thanks for clicking over to my blog today!


Thursday, November 4, 2010

My New Stamping Station!


Woo.Hoo!!!! I finally upgraded my work station. I was simply working from multiple Rubbermaid containers atop a card table and a 6ft folding table. THEN, Monday morning I saw a friend post a picture of this desk, offering it for sale. They are moving to CO [:( makes me sad] to help in planting Harvest Bible Chapel Denver [:) makes me happy!]. And they sold about 90% of their furniture and even their very large screen TV (which my husband probably really wanted to buy from them!). Anyway, $50 and a-lot-of-work-to-get-it-in-our-basement later.... I have an organized Stamping Station and am so excited about it! My things are much more accessible and in their own place. Yay!! Now, I just need to find a paper rack that will fit in that unit down on the lower left. Then I'll really be in business! It's a far cry from some of the stamping rooms out there, but it's a start!

November 4, 2010 Challenge 3

And one more challenge response card for the day. This is the Sketch Challenge from Just Add Ink this week. I will be making another with this sketch, but I'm pretty happy with this one. I make so few masculine cards that I get pretty excited when I turn out a good one! :) In fact, I like it so much that I made two, although they differ slightly. Oh, and the Navy looks better in real life than it does on screen/in picture!


Supplies:
Stamp Set: Afterthoughts [except without the afterthought LOL! I admit I only chose that set because I can ink only the phrase I want with markers and leave off the "afterthoughts" that give the set it's name!! :)]
Ink: Not Quite Navy
Paper: Crumb Cake, Elegant Soiree DSP, Not Quite Navy textured, Bashful Blue
Tools: my hands for wrinkling up the Bashful Blue!, Sticky Strip - under the strips of hemp twine
Embellishments: hemp twine, Antique Brad (my last one!! must get more)/Pewter Brads

Thanks, again, for clicking over to my blog!

November 4, 2010 Challenge 2

My second card of the day AND the second card made at my new stamping station! This was made for the color challenge at Stampin' Royalty this week. Again, I do not have Pear Pizzazz ink, so the flower stems are inked with Old Olive. I used the cracked glass technique (2-3 layers of Glassy Glaze on VersaMark ink, heated with the heat tool, of course; then stuck in the freezer for a few minutes and cracked upon retrieval from the freezer).

Supplies:
Stamp Sets: Close as a Memory, Watercolor Trio
Ink: Old Olive, Cajun Craze, Marina Mist, VersaMark
Paper: Pear Pizzazz, Marina Mist, Very Vanilla, Cajun Craze
Tools: 1/2" Circle punch, Large Oval punch, Scalloped Oval punch, Big Shot, Square Lattice Embossing Folder, Glassy Glaze Embossing Powder, heat tool
Embellishments: So Saffron Ribbon (from Dress Up Ribbon Originals, I believe), Vintage Brads

Thanks for clicking over to my blog today!

November 4, 2010 Challenge 1

I have a new and improved "stamping station"!! I'll post a picture later... But I had to break it in today! I went to my usual challenge sites where I found 2 color challenges and a sketch challenge. So, I got to work.

This is the first card I made. This is the color challenge from Stamping 411 this week. I added the black, but it's a neutral which usually doesn't really count. :) The picture that provided the source of the color combo includes black, as well as a light purple color, so I figured I was safe adding it in. I pretty much just took my inspiration straight from that picture. A "teen" bedspread with a circle pattern. This card, obviously, has a circle pattern and it's fitting for a teenaged girl. I had to make one modification to the color challenge: I don't have Pear Pizzazz ink, so I substituted with Certainly Celery.

Supplies:
Stamp Sets: Perfect Punches, Circle Circus, Simple Shapes
Ink: Certainly Celery, Tempting Turquoise, Melon Mambo, Basic Black
Paper: Certainly Celery, Basic Black, Whisper White, Melon Mambo
Tools: Double Scallop Ribbon Border punch, Wide Oval punch
Embellishments: 1/4" Certainly Celery Grosgrain ribbon, Basic Rhinestones, Designer Buttons Brights Tempting Turquoise

Thanks for clicking over to my blog!!