Sunday, October 31, 2010

Framed Paper Art

I've done a couple of projects recently for putting in frames and using as decor. One as a house-warming gift for my aunt who recently moved and the other for a coworker who asked me to put my creativity to work for her to use a Christmas gift. :)

This is the project for a coworker whose sister is having a baby. She plans to insert a sonogram picture in the blank spot framed with the brown rick rack. Here is a picture in the frame.


The scallop flowers were made with the scallop punches. The small one uses 2 of them, the large one 2 1/2! Scored straight across between all scallops, snipped (between two scallops) to the center. Then folded accordion-style and adhered to the next piece on either end. I adhered the buttons with Dimensionals and used small pieces of dimensionals as well as the 2 Way Glue Stick to adhere the flower to the sheet.

Here is a picture out of the frame, much easier to take and get accurate coloring (the flash just doesn't work with the glass)!
Supplies:
Paper: Elegant Soiree DSP, Soft Suede textured, Early Espresso textured, Cajun Craze, Very Vanilla
Tools: 2 3/8" and 1 3/4" Circle punches, Big Shot, Scallop Circle die, Circle Scissor Plus
Embellishments: 1/8" Very Vanilla Taffeta ribbon, crochet thread, Rick Rack from Hobby Lobby, Buttons from a Tube of Buttons from Hobby Lobby :)

----------

Here is the housewarming gift. Her living room is Americana themed. I took my Sahara Sand ink pad and swiped it on Whisper White textured card stock for the strips. I used smooth card stock, wrinkled it up, smoothed it out, swiped with Sahara Sand so it inked primarily the wrinkles, then punched the stars out. The "Under God" is in a great font called Bleeding Cowboy! I simply printed it out then tore it from the sheet with the Tearing Edge.


Supplies:
Ink: Sahara Sand
Paper: Cherry Cobbler, Whisper White textured and smooth, Not Quite Navy textured
Tools: Scallop Border punch, Small Star punch (retired)
Embellishment: Antique Brad

Thanks for clicking over to my blog today!

Thursday, October 28, 2010

Day of Gratitude

Seeing as how Thanksgiving is coming our way so quickly, I thought I'd play with the Thanksgiving set Day of Gratitude featured in the Holiday Mini Catalog!

The set is perfect for fall and Thanksgiving, but the "medallion" stamp in the set can be versatile. As you can see in this first picture, the "medallion" can be simply elegant. I have used it for a scrapbook page here along with the Butterfly Prints set.

Supplies:
Stamp Sets: Day of Gratitude, Butterfly Prints
Ink: Basic Black, VersaMark
Paper: Basic Black textured for the page and smooth for the punched pieces; Whisper White textured for the double scallop line and smooth for the other punched pieces
Tools: 2 3/8" and 1 3/4" Scallop Circle punches, Modern Label punch, 2" x 1 3/8" Oval punch, Butterfly punch, Double Scallop Ribbon Border punch, White Embossing Powder, Black EP, heat tool
Embellishments: Basic Rhinestones, Antique Brad

----------
Next, I wanted to redo a little gobbler I made 2 years ago! I had used colors that retired and also a retired stamp. I also added embellishments, which I didn't have on the other one! Here he is not on a card, but on a "stand." I cut a length of Early Espresso, 4 1/4" x 11". Scored at 4 1/4" (this is the back), 8 1/2" (front), and 10" (bottom), the extra is the flap where I put a length of Sticky Strip then adhered it to the inside of the back. The "feathers" are made with the scallop circle: counted off 5 scallops and scored a straight line (I will fold up these 5 after all the scoring); counted 2 up and 3 down (2+3=5) from the scored line, scoring these 5 scallops as well; and the same on the other side. Now I folded up the straight line that we first scored and then folded on the other two lines to go on the opposite side. This can give you a very dimensional effect or you can snip off the piece from the back which will make for easier adhering of the body. (Clear as mud, right? Punch out a scallop and try to do it step by step, I think it will make sense as you do it! I hope.)

Supplies:
Stamp Set: Day of Gratitude
Ink: Cajun Craze, Soft Suede, Old Olive, Basic Black for his eyes (hand drawn)
Paper: Early Espresso (textured for the turkeys body), More Mustard textured, Cajun Craze, Soft Suede textured, Whisper White
Tools: Double Scallop Ribbon border punch, 2" x 1 3/8" Oval punch, 1 3/4" Scallop Circle punch, 3/4" and 1 3/8" Circle punches, Boho Blossoms punch -- 2 of the smallest flower make the turkeys feet, and I clipped a "petal" of the medium sized flower for his beak
Embellishments: 1/8" Early Espresso Taffeta ribbon, Antique Brad

----------
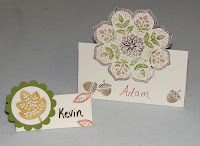
I also thought this set would make nice place cards for a Thanksgiving meal. My family is not that formal! But I know other people utilize place cards, so this is yet another way to use this set.
Supplies:
Stamps Set: Day of Gratitude
Ink: More Mustard, Cajun Craze; Markers: Early Espresso, Old Olive, Cajun Craze, Pumpkin Pie, River Rock, Soft Suede for the acorn (Early Espresso for the tops)
Paper: Very Vanilla, Old Olive
Tools: Hobby Blade to start the cutting out of the medallion, then paper snips to go all the way around (I simply scored on either side of the "medallion" and folded it down after I cut)

----------
One last non-card use for this set. I got this candle decorating idea from the mini catalog; but they used a different set and actually cut leaves and tied them in a bunch then took the tie around the candle. I wanted a simpler, less time-consuming way to decorate it. I also wanted to use the technique of VersaMark and the Stampin' Pastels. I stamped the "medallion" in VersaMark ink. Then took my sponge dauber, dabbed it onto one of the Pastel chalks, then dabbed it onto the image. Repeated in multiple colors; on this one I used Pumpkin Pie, Old Olive, More Mustard and Chocolate Chip. I also did 3 leaves around the side and back. This also has a piece of Old Olive, distressed on both edges, for the lower layer.

Supplies:
Stamp Set: Day of Gratitude
Ink: VersaMark, Chocolate Chip (for "Thanksgiving")
Paper: Old Olive, Very Vanilla
Tools: Stampin' Pastels, Modern Label punch, Sticky Strip
Embellishments: 1/8" Very Vanilla Taffeta ribbon, Designer Buttons Brights Old Olive


----------
Finally, I made a card. I was stretching myself to make things other than cards. Particularly, because I am doing a workshop next week and the hostess isn't so much into card-making. I, however, am! :) So, I had to make a few cards, but this one was my favorite.
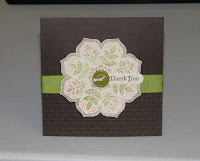
Supplies:
Stamp Set: Day of Gratitude
Ink: Early Espresso, Cajun Craze, Old Olive, Pumpkin Pie, River Rock
Paper: Early Espresso, Very Vanilla
Tools: Big Shot, Square Lattice Embossing Folder (just covered the lower half of the card front with the EF), Word Window punch
Embellishments: 5/8" Old Olive Grosgrain ribbon, Designer Buttons Brights Old Olive, crochet thread


Thanks so much for clicking over to my blog. Hope you found some helpful ideas and inspiration and a desire for this stamp set! LOL

October 28, 2010

I went over to Just Add Ink for the challenge. It's BIRTHDAY this week! Having just taught myself how to make this cute gift card holder (see yesterday's post for a tutorial on how to make it), I decided to make a birthday-themed one.


Supplies:
Stamp Set: Party Hearty
Ink: Rich Razzleberry, Regal Rose, Daffodil Delight
Paper: Rich Razzleberry, Regal Rose, Whisper White
Tools: Big Shot, Perfect Polka Dots Embossing Folder, Corner Rounder punch, Scallop Circle punch, 1" and 3/4" Circle punch, dimensional,
Embellishment: 3/8" Daffodil Delight Taffeta ribbon

Thanks for clicking over to my blog today!


Wednesday, October 27, 2010

Gift Card Holder


Here we go. I've got a tutorial on how to make a gift card holder. I've done the trial and error for you! :) Just read, look over the pics, jot down measurements and you'll be turnin' out gift card holders like crazy!

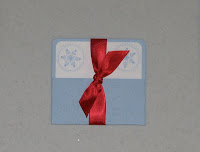
In this first picture you can see one finished holder with a card in it! You can also see that I started with a 5x5" square piece of card stock.


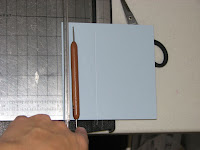
Then I scored one side at 1 3/4" (I use my stylus to score right on my paper cutter, after rubbing a piece of wax paper on my card stock for smooth scoring!)


Then I turned it so the scored line is toward the bottom of my cutter.


My paper cutter also has measurements up 3/4" on the other side of the blade. Conveniently, I am using 3/4" as my next measurement. I scored from the bottom up to the line I already scored. Then I cut from the top down to my scored line.


I flip it and do the other side (scoring from top down, cutting from bottom up now that it's flipped).
So, I now have this:

I cut at an angle between the scored lines at each corner, like so:

And also cut the corner at the bottom so you have tabs. You end up with this:

At this point I put mine in the Big Shot with the Northern Flurries Embossing folder. I cut a piece of Whisper White card stock 3"x3 1/4". You can stamp whatever you'd like on this piece. The one pictured at the top has "Just For You" and a snowflake. The one at the bottom is embellished with a ribbon and has no words on it. I rounded my corners then adhered this white piece to the almost-square part of the scored, tabbed piece. (I forgot to take a picture of this, so I pulled it back apart, hence the tears on the tabs! Oops)


Next, I folded the tabs in and put adhesive on the tabs as shown in the next picture.


Then with the tabs folded in, you fold up on the other, longer scored line, press, and voila! a gift card holder.

This is SUPER quick and easy. After having nailed down the measurements, I can make one in about 2 minutes! A gift card is an "easy" gift and this is an easy presentation for it, but they'll never know that because it's so cute!

Thanks for clicking over to my blog today! Please let me know if anything is unclear for if you have further questions!

(PS - sorry about the 2 pictures that won't enlarge. You can pretty much see what you need to in the small version.)

Monday, October 25, 2010

October 25, 2010

2 months til Christmas! If you make a Stampin' Up! wish list to pass on to gift-givers, they are free to call me anytime to place an order for YOUR gift. :) Also, if you know other stampers/scrappers who would like SU! stuff for Christmas you can purchase merchandise or a gift certificate for them through me!

Back to the here and now! This was the last card for my bundle of 40 cards that my friend is purchasing from me - as Christmas gifts, actually! LOL

I am pleased with this one. I was going to submit it for the Stampin' Royalty Recipe Challenge of "Ribbons, ribbons, ribbons," but their collection was closed. :(


Supplies:
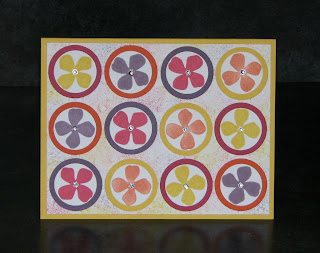
Stamp Sets: Circle Circus, Simply Said
Ink: Daffodil Delight, Real Red, Rich Razzleberry
Paper: Crumb Cake, Rich Razzleberry, Whisper White
Tools: 3/4" Circle punch, 1 1/4" Circle punch, Scallop Circle punches, Word Window punches; Big Shot, Perfect Polka Dots EF
Embellishments: 3/8" Daffodil Delight Taffeta ribbon, 5/16" Jumbo Brad Neutrals Silver

Thanks for clicking over to my blog!

Thursday, October 21, 2010

October 21, 2010

Last night I went to the Stamping 411 site and was glad to find this Color Challenge: Pacific Point, Pumpkin Pie and Melon Mambo. Since I've been working on 4o cards in bright colors, I'm always happy for inspiration. These are certainly bright colors! :)

Supplies:
Stamp Sets: Circle Circus, Rough Type
Ink: Melon Mambo, Pacific Point, Pumpkin Pie
Paper: Pacific Point, Whisper White
Tools: 1/2" and 3/4" Circle punches, Sticky Strip (I used a small piece to overlap the ribbon just a bit - that's the spot where I cinched it with the thread and button; then I put a small piece on the back of each circle to stick them to the ribbon)
Embellishments: Pumpkin Pie Striped Grosgrain ribbon (retired), Designer Buttons Brights Pumpkin Pie, crochet thread


Supplies:
Stamp Sets: Circle Circus, Thank You Kindly
Ink: Melon Mambo, Pumpkin Pie, Pacific Point, VersaMark
Paper: Crumb Cake, Whisper White
Tools: Heat Tool, White Embossing Powder, sponge, 1 3/8" 1 3/4" Circle punches
Embellishments: Basic Rhinestones, Pumpkin Pie Striped Grosgrain ribbon (retired)

Thanks for clicking over to my blog today!

Wednesday, October 20, 2010

October 20, 2010

This is a card similar to the card I have prepared for a workshop tomorrow! I've used different colors here and added rhinestones! I'm totally addicted to those little things. :) And I really like this set Butterfly prints with the coordinating Butterfly punch.

Supplies:
Stamp Sets: Butterfly Prints, A Word For You
Ink: Early Espresso, Rich Razzleberry
Paper: Crumb Cake, Daffodil Delight, Rich Razzleberry, Very Vanilla
Tools: Scallop Trim Border punch, Butterfly punch
Embellishments: 1/8" Early Espresso Taffeta ribbon, Basic Rhinestones

Thanks for clicking over to my blog today!

Saturday, October 16, 2010

October 16, 2010

My husband is 10 years older than I am and his oldest brother is another 12 years older. Sooo, when I got married, I suddenly had nieces and nephews only a few years younger than I! Well, one of them had a baby last week! I am now a great aunt. :) We are traveling a few hours to see them tomorrow after church and taking his great grandmother with us! I made this card to put with our gift (which is a St Louis Cardinals sleeper!).

Supplies:
Stamp Set: A Word for you
Ink: Real Red, Early Espresso
Paper: Crumb Cake, Daffodil Delight, Early Espresso textured, Tempting Turquoise
Tools: Dotted Scallop Ribbon Border punch
Embellishments: Brights Designer Buttons in Real Red, 1/8" Early Espresso Taffeta ribbon, glue dots

Thanks for clicking over to by blog today!

Friday, October 15, 2010

October 15, 2010

I made this card for a coworker who will be leaving us at the end of the month (she's moving closer to her family). But my color choice was base on the Just Add Ink challenge this week: Just Add Blue.


Supplies:
Stamp Sets: Circle Circus, , So Many Sayings
Ink: Not Quite Navy, Pink Pirouette, Marina Mist
Paper: Marina Mist, Not Quite Navy textured, Whisper White
Tools: 1 3/8" Circle punch, Wide Oval punch, Modern Label punch
Embellishments: 1/4" Whisper White grosgrain ribbon, Basic Rhinestones

Thank for clicking over to my blog today!

Thursday, October 14, 2010

October 14, 2010

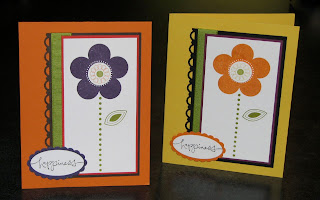
I've been trying new color combinations for this order of bright colored cards. I think I've come up with some good ones (hopefully the recipients think so as well!). I came up with a couple different color combos and did the card on the left. I thought the second combo would work well with the same card, so that's what I did! Since I'm putting together 2 packs of cards, for 2 people, I'll just put them in separate packs!

Supplies:
Stamp Sets: Punched Posies, Warm Words
Ink:
Left Card: Elegant Eggplant, Pumpkin Pie, Old Olive, Early Espresso
Right Card: Pumpkin Pie, Daffodil Delight, Old Olive, Basic Black
Paper:
Left Card: Pumpkin Pie, Early Espresso, Poppy Parade, Whisper White, Elegant Eggplant
Right Card: Daffodil Delight, Basic Black, Rich Razzleberry, Whisper White, Pumpkin Pie
Tools: 1" Circle punch, Scallop Trim punch, Scallop Oval punch, Large Oval punch
Embellishments: 5/8" Old Olive Grosgrain ribbon

Thanks for clicking over to my blog today!

Sunday, October 10, 2010

October 10, 2010 [10.10.10 :)]

I made this card for the Stamping 411 Saturday Sketch Challenge. (I flipped the sketch, though!)


Supplies:
Stamp Sets: Upsy Daisy, Sincere Salutations, Canvas background (I sponged the ink onto the stamp)
Ink: Chocolate Chip, Old Olive
Paper: Old Olive, Cameo Coral, Very Vanilla
Embellishments: 1 1/4" Striped Chocolate Chip Grosgrain ribbon

Friday, October 8, 2010

October 8, 2010

Butterflies and bling comin' at ya today! Just Add Ink's challenge this week is to make your card very feminine with pink and sparklies! I chose SU!'s dainty Pink Pirouette and one of their butterfly stamps, since butterflies are dainty as well. And, surprise, more rhinestones!! :)

This card used the kissing technique, for which this butterfly is perfect. I inked it up in Pink, then took my dot stamp inked in Espresso. My [p]inked :) butterfly resting rubber-up on the table, I kissed it with the dot stamp leaving Espresso colored dots on the butterfly. Then you take the butterfly and stamp it on your paper. The trick to this is a quick, light touch with the pattern stamp; press too hard and it will smudge. This kiss is just a peck - a butterfly kiss, if you will!!


Supplies:
Stamp Sets: For All You Do, Occasional Quotes, Polka Dots & Paisley
Ink: Pink Pirouette, Early Espresso (used Stampin' Write Marker to outline butterflies)
Paper: Pink Pirouette, Basic Gray textured, Whisper White, Early Espresso
Tools: Scallop Edge punch, Large Oval punch, Scalloped Oval punch, Dimensional, glue dots
Embellishments: Basic Rhinestones, Flower Fusion 2, Designer Buttons Neutrals

Thanks for clicking over to my blog today!

Wednesday, October 6, 2010

October 6, 2010

I'm back into the blog challenges this week!!! AND having more fun with rhinestones! This is one more card for the 2 packs I'm putting together or a friend to give as Christmas gifts. She wants cards with bright colors for the recipients. :)

This card is for 2 challenges. (I usually try not to combine, but I wasn't really getting anywhere with them individually!) The color scheme comes from the Stampin' Royalty Color Challenge for the week. Except I wanted my card to be a little brighter, so instead of So Saffron, I used Daffodil Delight. The layout is from this weeks Diva Coffee Break Designs Sketch Challenge, but I did flip the sketch.


Supplies:
Stamp Set: Garden Greetings
Ink: Chocolate Chip, Daffodil Delight, Tempting Turquoise
Paper: Concord Crush, Daffodil Delight, Whisper White, Tempting Turquoise
Tools: 1", 1 1/4" & 1 3/8" Circle punches, dimensional
Embellishments: Basic Rhinestones

Thanks for clicking over to my blog today!

Tuesday, October 5, 2010

October 5, 2010

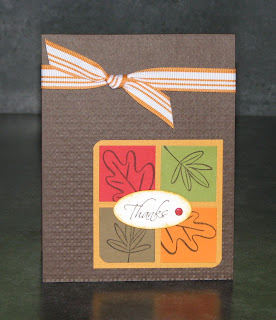
I wanted a thank-you card with a fall feel. I found this layout on Splitcoast and simply took it up a level with texture, sponging and a brad! :)


Supplies:
Stamp Set: Kind & Caring Thoughts, Fall Flair
Ink: Early Espresso, More Mustard,
Paper: Early Espresso, More Mustard, Real Red, Old Olive, Pumpkin Pie, Soft Suede
Tools: Big Shot, Square Lattice Embossing Folder, 1 1/4" Square punch, Corner Rounder punch, Large Oval punch
Embellishments: Striped Grosgrain Pumpkin Pie, Real Red brad

Thanks for clicking over to my blog!

Sunday, October 3, 2010

October 3, 2010

I made this card a few weeks ago, but I didn't have the rhinestones at the time. I looked at my finished product, but thought it was missing something. I finally got rhinestones and they were just what this card needed! I love SU!s Jewel Accents - a sheet of pearls or rhinestones with adhesive backing (no messy glue, no glue dots that are too big). Just peel 'em and stick 'em!


Supplies:
Stamp Set: For All You Do
Ink: Daffodil Delight, Perfect Plum, Rose Red, Tangerine Tango
Paper: Daffodil Delight, Whisper White, Rose Red, Tangerine Tango, Perfect Plum
Tools: 1" & 1 1/4" Circle punches, sponge (on Whisper White background)
Embellishments: Basic Rhinestones

Thanks for clicking over to my blog!